Session 11: Parameterization with BDD
Objectives
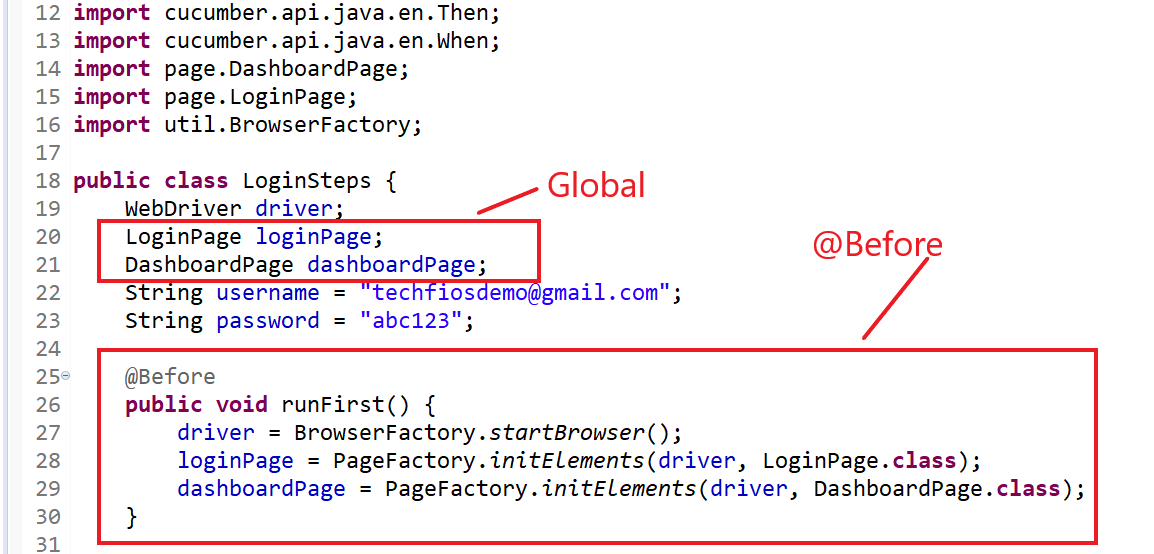
- Cucumber Annotations: @Before and @After
- Data Parameterization with Cucumber
- Screen Shot
- Demo: Test Case Automation with Parameterization and using Scenario Outline

Project URL: https://github.com/remotecontainer/BDD-Cucumber-Framework-Advance.git
https://[email protected]/codestack1/techfios-bdd-advance.git
Test Annotations
Cucumber Annotations:
@Before - A method that executes before each test method
@After - Method that executes after each test method
@Before - A method that executes before each test method
@After - Method that executes after each test method
Class Demo: Scenarios
1. Scenario: Valid users should be able to login using embedded parameters
Given a valid user
When user goes to Techfios Site
Then Login Page should be displayed
When user logs in with valid "[email protected]" and "abc123"
Then Dashboard page should display
Note: Dryrun runner class to get suggestion from the console for the step implementations. If no suggestion found for the passing parameters, use syntax \"(.*)\" in the step definitions mapping statement.
2. Scenario Outline: Valid users should be able to login using example
Given a valid user
When user goes to Techfios Site
Then Login Page should be displayed
When user logs in with valid "<username>" and "<password>"
Then Dashboard page should display
Examples:
| username | password |
| [email protected] | abc123 |
| [email protected] | abc123 |
Given a valid user
When user goes to Techfios Site
Then Login Page should be displayed
When user logs in with valid "<username>" and "<password>"
Then Dashboard page should display
Examples:
| username | password |
| [email protected] | abc123 |
| [email protected] | abc123 |
3. Scenario Outline: Users would be able to add new account
Given a user already logged in as "<username>" and "<password>"
When user navigate to Bank Cash -> New Account Page
Then New Accounts Page should display
When user submits "<title>", "<description>" and "<initial balance>"
Then Account created successfully message should display
Examples:
| title | description|initial balance| username | password |
| Stine | Golf |10000 | [email protected] | abc123 |
| Mike | Tennis |2 000 | [email protected] | abc123 |
Screen Shot
1. Add the following dependencies to your existing project:"
<dependency>
<groupId>org.apache.poi</groupId>
<artifactId>poi</artifactId>
<version>3.17</version>
</dependency>
<dependency>
<groupId>org.apache.poi</groupId>
<artifactId>poi-ooxml</artifactId>
<version>3.17</version>
</dependency>
<dependency>
<groupId>org.apache.commons</groupId>
<artifactId>commons-io</artifactId>
<version>1.3.2</version>
</dependency>
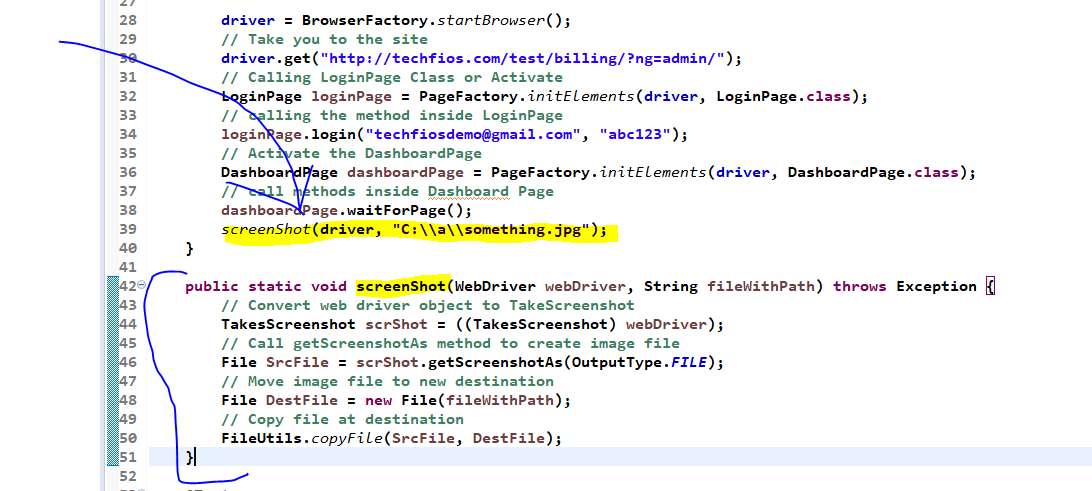
2. Paste the following method in BasePage or any page and import all red underlined:
public static void screenShot(WebDriver driver, String fileWithPath) throws Exception {
// Convert web driver object to TakeScreenshot
TakesScreenshot scrShot = ((TakesScreenshot) driver);
// Call getScreenshotAs method to create image file
File SrcFile = scrShot.getScreenshotAs(OutputType.FILE);
// Move image file to new destination
File DestFile = new File(fileWithPath);
// Copy file at destination
FileUtils.copyFile(SrcFile, DestFile);
}
2. Paste the following to take screen shot where needed. File path is in string format and must use double backward slash folder scheme. Any given name for folder and/or file - will create a one and store the image:
screenShot(driver, "C:\\FolderName\\FileName.jpg");
<dependency>
<groupId>org.apache.poi</groupId>
<artifactId>poi</artifactId>
<version>3.17</version>
</dependency>
<dependency>
<groupId>org.apache.poi</groupId>
<artifactId>poi-ooxml</artifactId>
<version>3.17</version>
</dependency>
<dependency>
<groupId>org.apache.commons</groupId>
<artifactId>commons-io</artifactId>
<version>1.3.2</version>
</dependency>
2. Paste the following method in BasePage or any page and import all red underlined:
public static void screenShot(WebDriver driver, String fileWithPath) throws Exception {
// Convert web driver object to TakeScreenshot
TakesScreenshot scrShot = ((TakesScreenshot) driver);
// Call getScreenshotAs method to create image file
File SrcFile = scrShot.getScreenshotAs(OutputType.FILE);
// Move image file to new destination
File DestFile = new File(fileWithPath);
// Copy file at destination
FileUtils.copyFile(SrcFile, DestFile);
}
2. Paste the following to take screen shot where needed. File path is in string format and must use double backward slash folder scheme. Any given name for folder and/or file - will create a one and store the image:
screenShot(driver, "C:\\FolderName\\FileName.jpg");
Homework
Automate the following scenario using BDD and push the code to create a pull request.
Scenario Outline: User should be able to Add Contact
Given a user logged in
When user goes to CRM -> Add Contact Page
Then Contacts Page should display
When user fill in the Add Contact form using "<name>" "<company>" "<email>" etc.
Then created contact will be displayed
Examples:
| name | company | email | etc....
| John454 | Techfios | [email protected] | etc...
Shortcuts/Tricks:
“Ctrl + Shift + F + O” - Alight and remove unused imports.
“Ctrl + Alt + Down" - Duplicate the row where is the cursor is.
"Alt + Left" - Navigate back.
"Alt + Right" - Navigate forward.
“Ctrl + Alt + Down" - Duplicate the row where is the cursor is.
"Alt + Left" - Navigate back.
"Alt + Right" - Navigate forward.
