Session 6: GIT
Objectives
- Code Management and Collaboration
- Demo: Github Repository Creation
- Class Activity: Create a personal GitHub Account
- Concept of Version Control: clone, pull, branch, commit, merge, push, and pull request
- Demonstration: How to Upload, Pull, Create Branch, Add/Commit changes, Push to origin, Create a Pull request
- Class Activity:
- Installation of GitBash
- Cloning and branching of a project
- Add a class
- Add/Commit the branch
- Push the branch to the Origin
- Create a pull request
Code Management and Collaboration
Image
Code Management and Collaboration, Benefits:
1. Impossible to run all the test cases in PC,
2. Collaboration is not possible if code is not located
in a central location,
3. Server running the code is headless and it is faster.
4. Work remotely,
Headless: means running test cases without a browser.
Repository: is a storage for something.
Github - is a free online code repository
BitBucket - Not free, but works well with JIRA
Stash -
PR - Pull Request
ALM/TestRail vs. JIRA
1. Test Case Management 1. Project Management Tool
Tool
2. Only QA Manual Tester 2.Entire Company uses
use this
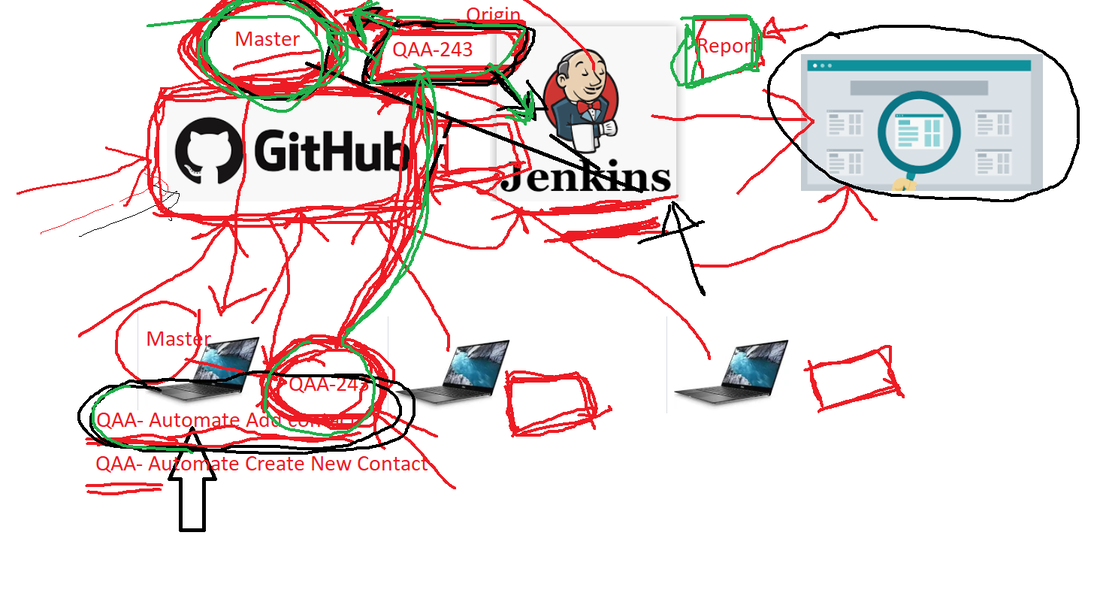
Github is a site that uses GIT language to manage code.
GIT - is a command line language/code for version control
Merge Conflict - If two branches have the change of code
in the same class, merge conflict will arise.
# How to handle merge conflict?
> Meet with the other QA
> Discuss which methods to keep
> and which methods to delete Notes
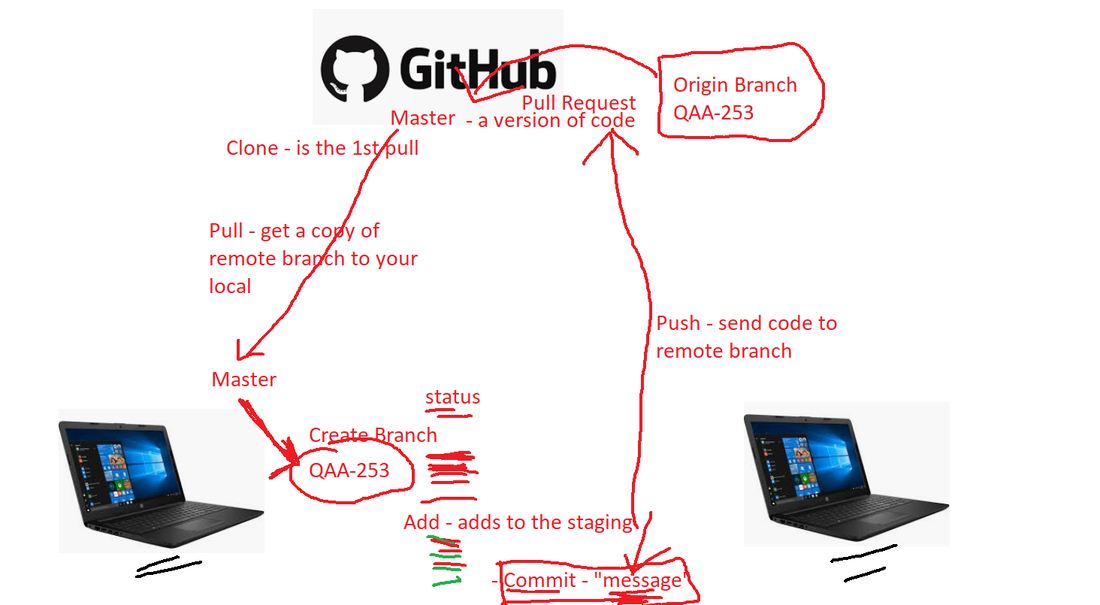
merge: Accepting your code changes.
Pull: When you make a copy of the master
Add: Add all the files you created
Commit: When you finalize your work. Same as save button.
Commit msg: In order to keep a record of what you did.
> Multiple commits/commit msg in the same test case
> Good to commit work in increments, so that if you
have errors later which can't be fixed, you can
at least go back to the last commit.
Push: When you are sending your code up to the master.
Now everyone can see your branch.
Origin: Is the cloud where the master remains. Where you
pulled the code from.
Pull Request: When you want your code to be merged with
master. PRs
Merge Conflict: When two people work on the same class
and try to merge code, a merge conflict will
show up. Both the QA engineers will have to meet
and decide who's code or combination of codes will
need to be kept or deleted.
UI Git Process:
Send initial code to the GitHub:
1. Right click>Teams>Share Project,
2. Create a new repository by clicking on
create button and give it a unique name
3. Click finish.
Commit Steps:
1. Right click again>Teams>Commit
2. Pull all the files from unstaged to stage area
3. Write a commit message,
4. Click "Commit and Push"
5. Provide gitHub url and username/password,
6. next>next>finish.
1. Impossible to run all the test cases in PC,
2. Collaboration is not possible if code is not located
in a central location,
3. Server running the code is headless and it is faster.
4. Work remotely,
Headless: means running test cases without a browser.
Repository: is a storage for something.
Github - is a free online code repository
BitBucket - Not free, but works well with JIRA
Stash -
PR - Pull Request
ALM/TestRail vs. JIRA
1. Test Case Management 1. Project Management Tool
Tool
2. Only QA Manual Tester 2.Entire Company uses
use this
Github is a site that uses GIT language to manage code.
GIT - is a command line language/code for version control
Merge Conflict - If two branches have the change of code
in the same class, merge conflict will arise.
# How to handle merge conflict?
> Meet with the other QA
> Discuss which methods to keep
> and which methods to delete Notes
merge: Accepting your code changes.
Pull: When you make a copy of the master
Add: Add all the files you created
Commit: When you finalize your work. Same as save button.
Commit msg: In order to keep a record of what you did.
> Multiple commits/commit msg in the same test case
> Good to commit work in increments, so that if you
have errors later which can't be fixed, you can
at least go back to the last commit.
Push: When you are sending your code up to the master.
Now everyone can see your branch.
Origin: Is the cloud where the master remains. Where you
pulled the code from.
Pull Request: When you want your code to be merged with
master. PRs
Merge Conflict: When two people work on the same class
and try to merge code, a merge conflict will
show up. Both the QA engineers will have to meet
and decide who's code or combination of codes will
need to be kept or deleted.
UI Git Process:
Send initial code to the GitHub:
1. Right click>Teams>Share Project,
2. Create a new repository by clicking on
create button and give it a unique name
3. Click finish.
Commit Steps:
1. Right click again>Teams>Commit
2. Pull all the files from unstaged to stage area
3. Write a commit message,
4. Click "Commit and Push"
5. Provide gitHub url and username/password,
6. next>next>finish.
Github Repository Creation
- Go to github.com
- Login (username: autotechnotes, password: Irving@123)
- In the upper right corner, click + and then select New Repository
- Give Repository Name: FirstName+LastInitial+Session5
- Click Create Repository
Version Control
Notes
GitBash Installation
- Open your web browser, and go to https://git-scm.com/downloads
- Click the Download button on the monitor image
- Click on the downloaded exe file
- Continue clicking next until installation starts
- Click finish when done
GitBash Command Line:
1. Create a local repository and upload project (FIRST TIME ONLY):
1. Open GitBash in the folder where the project is located,
2. Type> git init - This will create a repository in your computer,
3. Type> git status - This will show which branch you are on and file status
4. Type> git add . - This will include all files in the staging area to be committed,
5. Type> git commit -m "Message goes here" - This will commit all changes and include a message
6. Type> git remote add origin [project url] - This will link remote to your local repository
7. Type> git push -u origin master - This will push your code to the remote master branch
2. Clone the project (FIRST TIME):
1. Open GitBash in a folder of your choice,
2. Type> git init
3. Type> git clone [project url] - This will clone the project into your local
4. Close GitBash and reopen GitBash in the new cloned folder
5. Type> mvn clean
6. Type> mvn install
7. Open Eclipse, go to new, click Open Project From File System,
8. Browse to the project folder and click finish.
3. Update code and create a pull request (FOR EVERY TEST CASE):
1. Open GitBash in the folder where the project is located,
2. Type> git branch - This will show you which branch you are on
3. Type> git pull - If you are on master, this will pull the latest code
4. Type> git checkout -b [new branch name] - This will copy the master into your new branch
5. Go back to your project and write your code, then open GitBash again,
6. Type> git add .
7. Type> git commit -m "Message goes here"
8. Type> git checkout master - This will move you to master branch
9. Type> git pull - This will pull the latest master
10. Type> git checkout [your branch name] - This will move you back to your branch
11. Type> git merge master - This will bring new master code to yours
12. Type> git push -u origin [your branch name] - This will create new branch in remote and with your code,
13. Login to remote repository (GitHub or BitBucket) to manually create a pull request.
Note: Password Issue: git credential-manager uninstall.
1. Open GitBash in the folder where the project is located,
2. Type> git init - This will create a repository in your computer,
3. Type> git status - This will show which branch you are on and file status
4. Type> git add . - This will include all files in the staging area to be committed,
5. Type> git commit -m "Message goes here" - This will commit all changes and include a message
6. Type> git remote add origin [project url] - This will link remote to your local repository
7. Type> git push -u origin master - This will push your code to the remote master branch
2. Clone the project (FIRST TIME):
1. Open GitBash in a folder of your choice,
2. Type> git init
3. Type> git clone [project url] - This will clone the project into your local
4. Close GitBash and reopen GitBash in the new cloned folder
5. Type> mvn clean
6. Type> mvn install
7. Open Eclipse, go to new, click Open Project From File System,
8. Browse to the project folder and click finish.
3. Update code and create a pull request (FOR EVERY TEST CASE):
1. Open GitBash in the folder where the project is located,
2. Type> git branch - This will show you which branch you are on
3. Type> git pull - If you are on master, this will pull the latest code
4. Type> git checkout -b [new branch name] - This will copy the master into your new branch
5. Go back to your project and write your code, then open GitBash again,
6. Type> git add .
7. Type> git commit -m "Message goes here"
8. Type> git checkout master - This will move you to master branch
9. Type> git pull - This will pull the latest master
10. Type> git checkout [your branch name] - This will move you back to your branch
11. Type> git merge master - This will bring new master code to yours
12. Type> git push -u origin [your branch name] - This will create new branch in remote and with your code,
13. Login to remote repository (GitHub or BitBucket) to manually create a pull request.
Note: Password Issue: git credential-manager uninstall.
Additional Notes
Activity/Homework: Automate, push, and create a pull request for the following test case. (TBD)
Scenario: Add new account on Techfios Site
Beginner:
1: Open Browser and go to site http://techfios.com/test/billing/?ng=admin/
2. Enter username: [email protected]
3. Enter password: abc123
4. Click login button
5. Click on Bank & Cash
6. Click on New Account
7. Fill in the Add New Account Form (Randomize Account Title and Balance)
8. Click submit,
Intermediate:
9. Validate the presence of "Account Created Successfully" message
Advance:
10. Scroll Down,
11. Validate new account showed up in the bottom of the table
12. Delete that account
13. Validate account deleted from the bottom of the table
Interview Questions
1. What are the different types of locators in Selenium?
3. What is the difference between "/" and "//" in xpath?
4. How can you launch the browser using WebDriver?
5. What are the different types of waits available in WebDriver?
6. How to type in a text box using Selenium?
7. How many ways can you select a value from drop down using a Select Class?
8. How can you determine the existence of iFrames?
9. How to handle frame in WebDriver?
10. How do you handle popups?
11. How do you handle Hover over?
12. How do you handle new tab?
13. What is the difference between driver.close and driver.quit?
14. Can Selenium handle Window Based popups? Use AutoIT or Robot Class to handle
15. How can you assert the title of the web page?
Answers: https://www.softwaretestinghelp.com/selenium-interview-questions-answers/
References:
Shortcuts/Tricks:
“Ctrl + Shift + F + O” - Align and remove unused imports.
“Ctrl + Alt + Down" - Duplicate the row where is the cursor is.
"Alt + Left" - Navigate back.
"Alt + Right" - Navigate forward.
“Ctrl + Alt + Down" - Duplicate the row where is the cursor is.
"Alt + Left" - Navigate back.
"Alt + Right" - Navigate forward.
