0. Types of Elements:
1. Selenium Fundamental Methods:
1. id()
2. name()
3. class()
4. css()
5. linkText()
6. partialLinkText()
7. xpath()
Locator Use Priority:
1. id()
2. name()
3. CSS()
4. xpath()
5. LinkText()
6. Class()
7. partialLinkText()
2B. Action
Do something:
In Console: Type - document.queryselectall(" use one of the below 5 syntax here ")
1. tag#id
2. tag.class
3. tag[attribute='value']
4. tag.class[attribute='value']
5. tag:contains("inner text")
4. XPATH
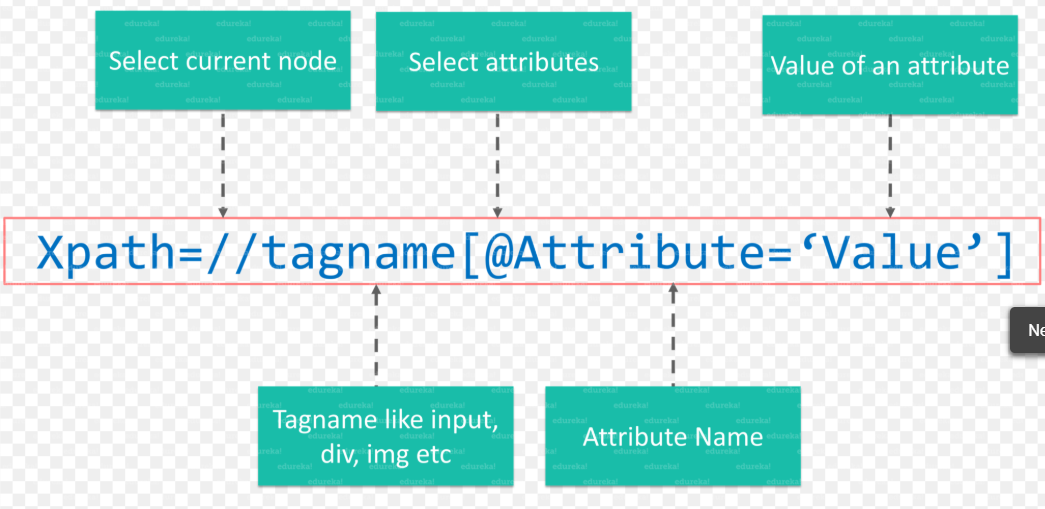
What is XPath?XPath is defined as XML path. It is a syntax or language for finding any element on the web page using XML path expression. XPath is used to find the location of any element on a webpage using HTML DOM structure. The basic format of XPath is explained below with screen shot.
There are two types of XPath:
1) Absolute XPath: It is the direct way to find the element, but the disadvantage of the absolute XPath is that if there are any changes made in the path of the element then that XPath gets failed. Try not to use it.
Example: html/body/div[1]/section/div[1]/div/div/div/div[1]/div/div/div/div/div[3]/div[1]/div/h4[1]/b
2) Relative XPath:
- Button - tagname = tagname usually is button with button name as text
- input/search field - tagname usually is input
- HyperLink - tagname usually is a with attribute href with link name as text
- UI TEXT Display
- Graphs/images
1. Selenium Fundamental Methods:
- get() - To go to a website
- getTitle() - Returns the title of the page with with tag name “Title”
- getCurrentUrl() - Returns current page url
- getPageSource() - Returns the source code of the page
- getWindowHandle() - Returns current window handle number
- getWindowHandles() - Returns all the window handle numbers
- navigate() - To go back, forward, and refresh page
- switchTo() - To focus the driver to a different frame or window
- manage() - Will be used to change window size
- wait() - To slow down the driver
- findelement() - To locate an element
- findelements() - To locate multiple similar elements
- close() - To close the browser
- quit() - To quit the driver
1. id()
2. name()
3. class()
4. css()
5. linkText()
6. partialLinkText()
7. xpath()
Locator Use Priority:
1. id()
2. name()
3. CSS()
4. xpath()
5. LinkText()
6. Class()
7. partialLinkText()
2B. Action
Do something:
- click() - click a button
- clear() - clear a search field
- sendKeys(“text”) - type something into search field or textbox
- getText() - returns text UI information
- getSize() - returns the size of the element
- getAttribute(“anyName”) - returns the value of the attribute
- isDisplayed() - returns true/false
- isEnabled() - returns true/false
- isSelected() - returns true/false
In Console: Type - document.queryselectall(" use one of the below 5 syntax here ")
1. tag#id
2. tag.class
3. tag[attribute='value']
4. tag.class[attribute='value']
5. tag:contains("inner text")
4. XPATH
What is XPath?XPath is defined as XML path. It is a syntax or language for finding any element on the web page using XML path expression. XPath is used to find the location of any element on a webpage using HTML DOM structure. The basic format of XPath is explained below with screen shot.
There are two types of XPath:
1) Absolute XPath: It is the direct way to find the element, but the disadvantage of the absolute XPath is that if there are any changes made in the path of the element then that XPath gets failed. Try not to use it.
Example: html/body/div[1]/section/div[1]/div/div/div/div[1]/div/div/div/div/div[3]/div[1]/div/h4[1]/b
2) Relative XPath:
a. text(): Use text() method to find an element with displayed text or attribute value. No at the rate “@” symbol needed. Example,
Node: <a href = “mercuryunderconst.php” >your destination</a>
Xpath: //a[text()='Sign']
b. Contains(): Use contains() to find the element with partial text or attribute value by passing the attribute as the parameter. When using contains, "=" has to be replaced with a ","
Example,
Node: <a href = “mercuryunderconst.php” >your destination</a>
Xpath: //a[contains(text(), ‘destination’)]
c. “*” – use this symbol to search all nodes. Example,
Node: <a href = “mercuryunderconst.php” >your destination</a>
Xpath: //*[contains(text(), ‘destination’)]
d. AND: When using “and”, two conditions must be satisfied. Example,
Xpath: //input[@type='submit' and @name='btnLogin']
e. OR: When using “or”, any one of the two conditions can be satisfied. Example,
Xpath: //input[@type='submit' or @name='btnLogin']
Node: <a href = “mercuryunderconst.php” >your destination</a>
Xpath: //a[text()='Sign']
b. Contains(): Use contains() to find the element with partial text or attribute value by passing the attribute as the parameter. When using contains, "=" has to be replaced with a ","
Example,
Node: <a href = “mercuryunderconst.php” >your destination</a>
Xpath: //a[contains(text(), ‘destination’)]
c. “*” – use this symbol to search all nodes. Example,
Node: <a href = “mercuryunderconst.php” >your destination</a>
Xpath: //*[contains(text(), ‘destination’)]
d. AND: When using “and”, two conditions must be satisfied. Example,
Xpath: //input[@type='submit' and @name='btnLogin']
e. OR: When using “or”, any one of the two conditions can be satisfied. Example,
Xpath: //input[@type='submit' or @name='btnLogin']
XPath axes methods: http://demo.guru99.com/V4/
a) Following: Goes to any node after a the current node. Example,
//*[@type='text']//following::input
//*[@type='text']//following::input[1]
b) Ancestor: Goes to any node before a the current node. Example,
//input[@name='password']//ancestor::table
c) Child: Goes to all children nodes within the current node. Example,
//form[@name="frmLogin"]//child::table
d) Preceding: Goes to all nodes that come before the current node. Example,
//input[@type='password']//preceding::input
e) Following-sibling: Goes to all nodes that come after the current node on the same level. Example,
//input[@type='password']//following-sibling::label
f) Parent: Goes to the immediate parent node of the current node. Example,
//input[@type='password']//parent::td
f) Descendant: Goes far down the line of the current node. Example,
//div[@class="container-fluid"]//descendant::a
Wait: 3 types,
1. Implicit Wait: "always to be found in" - The implicit wait will tell to the web driver to wait for certain amount of time before it throws a "No Such Element Exception" standardized for the whole test full of elements. The default setting is 0. Once we set the time, web driver will wait for that time before throwing an exception. Implicit wait will accept 2 parameters, the first parameter will accept the time as an integer value and the second parameter will accept the time measurement in terms of SECONDS, MINUTES, MILISECOND, MICROSECONDS, NANOSECONDS, DAYS, HOURS, etc. Example,
2. Explicit Wait: "stated clearly and in detail, leaving no room for confusion or doubt." - The explicit wait is used to tell the Web Driver to wait for certain conditions (Expected Conditions) or the maximum time exceeded before throwing an "ElementNotVisibleException" exception. The explicit wait is an intelligent kind of wait can be applied only for specified elements. By default the polling/pinging period is 250-500 millisecond. Used to check if page loaded. Example,
3. Fluent Wait: The fluent wait is used to tell the web driver to wait for a condition, as well as the frequency with which we want to check the condition before throwing an "ElementNotVisibleException" exception.
Example,
1. Implicit Wait: "always to be found in" - The implicit wait will tell to the web driver to wait for certain amount of time before it throws a "No Such Element Exception" standardized for the whole test full of elements. The default setting is 0. Once we set the time, web driver will wait for that time before throwing an exception. Implicit wait will accept 2 parameters, the first parameter will accept the time as an integer value and the second parameter will accept the time measurement in terms of SECONDS, MINUTES, MILISECOND, MICROSECONDS, NANOSECONDS, DAYS, HOURS, etc. Example,
- driver.manage().timeouts().implicitlyWait(10,TimeUnit.SECONDS) ;
2. Explicit Wait: "stated clearly and in detail, leaving no room for confusion or doubt." - The explicit wait is used to tell the Web Driver to wait for certain conditions (Expected Conditions) or the maximum time exceeded before throwing an "ElementNotVisibleException" exception. The explicit wait is an intelligent kind of wait can be applied only for specified elements. By default the polling/pinging period is 250-500 millisecond. Used to check if page loaded. Example,
- WebDriverWait wait = new WebDriverWait(driver, 60); //time in secs
- wait.until(ExpectedConditions.visibilityOfElementLocated(Element Locator));
- elementToBeClickable()
- invisibilityOfTheElementLocated()
- presenceOfElementLocated()
- visibilityOfElementLocated()
3. Fluent Wait: The fluent wait is used to tell the web driver to wait for a condition, as well as the frequency with which we want to check the condition before throwing an "ElementNotVisibleException" exception.
- It's a class part of org.openqa.selenium.support.ui package
- It is an implementation of the wait interface
- Defines a maximum amount of time to wait
- Defines the frequency with which to check the condition
- Able to ignore exceptions such as NoSuchElement while polling
Example,
- Wait<WebDriver> wait = new FluentWait<WebDriver>(driver)
- .withTimeout(30, TimeUnit.SECONDS)
- .pollingEvery(5, TimeUnit.SECONDS)
- .ignoring(NoSuchElementException.class);
How to Handle
Alert/popup: Alert is a small message box which displays on-screen notification to give the user some kind of information or ask for permission to perform certain kind of operation. It may be also used for warning purpose. https://mail.rediff.com/cgi-bin/login.cgi and http://demo.guru99.com/test/delete_customer.php
1) void dismiss() // To click on the 'Cancel' button of the alert.
driver.switchTo().alert().dismiss();
2) void accept() // To click on the 'OK' button of the alert.
driver.switchTo().alert().accept();
3) String getText() // To capture the alert message.
driver.switchTo().alert().getText();
4) void sendKeys(String stringToSend) // To send some data to alert box.
driver.switchTo().alert().sendKeys("Text");
iFrame: IFrame is a web page which is embedded in another web page or an HTML document embedded inside another HTML document. https://docs.oracle.com/javase/8/docs/api/
- Right click on the element, If you find the option like 'This Frame' then it is an iframe.
- Int size = driver.findElements(By.tagName("iframe")).size(); //Will provide total number of frames
- Inspect the DOM for tag name "frame".
- By Index - driver.switchTo().frame(0);
- By Name or Id - driver.switchTo().frame("iframe1"); or driver.switchTo().frame("id of the element");
- By Web Element - driver.switchTo().frame(WebElement);
- driver.switchTo().parentFrame();
- driver.switchTo().defaultContent();
Mouse Hover Over: Action class is needed when executing mouse over. Example, https://www.dell.com/en-us
Actions builder = new Actions(driver);
actions.moveToElement(driver.findElement(By.linkText("Financing"))).build().perform();
Other Actions:
clickAndHold() - Clicks (without releasing) at the current mouse location.
doubleClick() - Performs a double-click at the current mouse location.
dragAndDrop(source, target) - Performs click-and-hold at the location of the source element, moves to the location of the target element, then releases the mouse.
dragAndDropBy(source, x-offset, y-offset) - Performs click-and-hold at the location of the source element, moves by a given offset, then releases the mouse.
moveToElement(toElement) - Moves the mouse to the middle of the element.
release() - Releases the depressed left mouse button at the current mouse location
Scroll Down/up: It is used to move the window up and down. Use JavascriptExecutor. Selenium supports javaScriptExecutor. There is no need for an extra plugin or add-on. You just need to import (org.openqa.selenium.JavascriptExecutor) in the script as to use JavaScriptExecutor.
Code:
JavascriptExecutor js = (JavascriptExecutor) driver;
js.executeScript("scroll(0,400)");
js.executeScript("window.scrollBy(0,1000)");
or
((JavascriptExecutor)getDriver()).executeScript("scroll(0,400)");
Code:
JavascriptExecutor js = (JavascriptExecutor) driver;
js.executeScript("scroll(0,400)");
js.executeScript("window.scrollBy(0,1000)");
or
((JavascriptExecutor)getDriver()).executeScript("scroll(0,400)");
Switch Window: Go to google, type xpath, select link to navigate to w3school site, and click on SQL
System.out.println(driver.getWindowHandles()); (Optional)
for (String handle: driver.getWindowHandles()) {
driver.switchTo().window(handle);
}
System.out.println(driver.getWindowHandles()); (Optional)
for (String handle: driver.getWindowHandles()) {
driver.switchTo().window(handle);
}
Keyboard Keys: The sendKeys() method of the WebElement class is used to automate the keyboard actions or events. Example,
webElement.sendKeys(Keys.ENTER);
Others:
BACK_SPACE Keys.TAB Keys.ENTER Keys.SHIFT Keys.CONTROL
Keys.ALT Keys.PAUSE Keys.ESCAPE Keys.SPACE Keys.PAGE_UP
Keys.PAGE_DOWN Keys.END Keys.HOME Keys.LEFT Keys.UP
Keys.RIGHT Keys.DOWN Keys.INSERT Keys.DELETE
webElement.sendKeys(Keys.ENTER);
Others:
BACK_SPACE Keys.TAB Keys.ENTER Keys.SHIFT Keys.CONTROL
Keys.ALT Keys.PAUSE Keys.ESCAPE Keys.SPACE Keys.PAGE_UP
Keys.PAGE_DOWN Keys.END Keys.HOME Keys.LEFT Keys.UP
Keys.RIGHT Keys.DOWN Keys.INSERT Keys.DELETE
Select Option from Drop-Down Box: User select class to locate drop down elements. Example
Select fruits = new Select(driver.findElement(By.id("fruits")));
fruits.selectByVisibleText("Banana");
fruits.selectByIndex(1);
Select fruits = new Select(driver.findElement(By.id("fruits")));
fruits.selectByVisibleText("Banana");
fruits.selectByIndex(1);
