Session 7: Page Object Model

- Definition and importance of Framework
- Page Object Model
- Build Maven TestNG Framework with Page Object Model
- TestNG Reports
- Concepts: Browser Factory, Page Factory, @After Method
- Clone the project from Github (autotechnotes/Irving@123)
- Create a local branch
- Automate a test case: TBD
- Git Add/Commit/Push
- Create a pull request
- Merge the PR
Page Object Model
Build Maven TestNG Framework
Prerequisites:
1. JDK 8 installed and environment set (Systems variable: JAVA_HOME/JDK, Path/bin),
2. Maven installed and environment set (Systems variable: M2_HOME/maven, path/bin),
3. Eclipse configured with JDK 8 (Window>Preferences>Java>Installed JRE = JKD 8),
4. Eclipse configured with Maven (Help> Eclipse Marketplace > Install Maven Integration for Eclipse), &
5. Eclipse configured with TestNG plugin (Help> Eclipse Marketplace > Install TestNG for Eclipse).
Steps:
Step 1: Create a Maven Project with group ID and Artifact ID (See session 1),
Step 2: Import Dependencies (Selenium-java and TestNG) in POM file and click Ctrl+S to save/import,
Step 3: Right click on project > Run As > Maven Build > Goals: clean install > Run,
Step 4: Create a folder called "driver" and save the chromedriver.exe file in that folder.
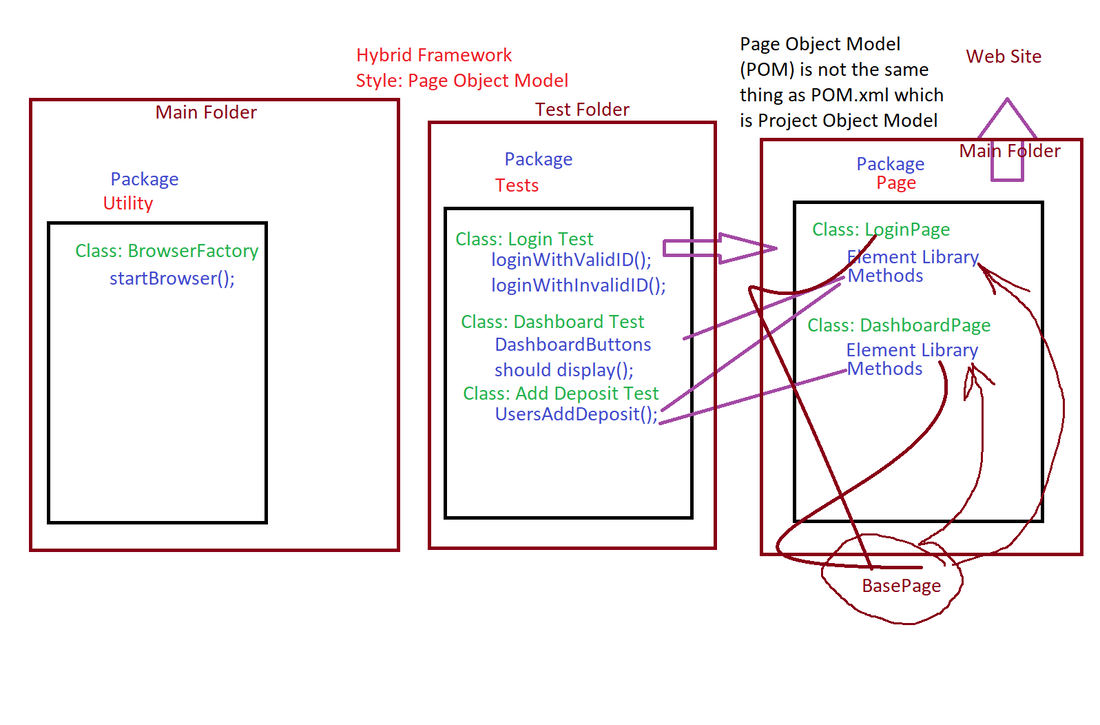
Step 5: You should have two folders called MAIN and TEST
A. Create two packages called "page" and "util" inside the MAIN folder,
B. Create a package called "test" inside the TEST folder,
Step 6: Create BrowserFactory class inside "util" Package and copy the code below,
Step 7: Create LoginTest class inside "test" package and copy the code below,
Step 8: Create LoginPage class inside "page" package and copy the code below.
Step 8: Create a BasePage class inside the "page" package and copy the code below,
All other classes will be inside either the page package or the test package. PageClass
will go inside page package and TestClass will go inside the test package.
Step 2: Import Dependencies (Selenium-java and TestNG) in POM file and click Ctrl+S to save/import,
Step 3: Right click on project > Run As > Maven Build > Goals: clean install > Run,
Step 4: Create a folder called "driver" and save the chromedriver.exe file in that folder.
Step 5: You should have two folders called MAIN and TEST
A. Create two packages called "page" and "util" inside the MAIN folder,
B. Create a package called "test" inside the TEST folder,
Step 6: Create BrowserFactory class inside "util" Package and copy the code below,
Step 7: Create LoginTest class inside "test" package and copy the code below,
Step 8: Create LoginPage class inside "page" package and copy the code below.
Step 8: Create a BasePage class inside the "page" package and copy the code below,
All other classes will be inside either the page package or the test package. PageClass
will go inside page package and TestClass will go inside the test package.
Project URL: https://github.com/autocodejam/TechfiosBeginner.git
Class Code
Browser Factory:
// global, so all methods can use
static WebDriver driver;
public static WebDriver startBrowser() {
// Set Chrome Driver Properties
System.setProperty("webdriver.chrome.driver", "./drivers/chromedriver.exe");
// Create ChromeDriver object and launch chrome browser
WebDriver driver = new ChromeDriver();
// return the driver to the test class
return driver;
}
LoginTest:
WebDriver driver;
@BeforeMethod
public void launchBrowser() {
// Starts the browser and saves the driver in the test class
driver = BrowserFactory.startBrowser();
}
@Test(priority = 1)
public void validUserShouldBeAbleToLogin() {
// Take you to the site
driver.get("http://techfios.com/test/billing/?ng=admin/");
// Calling LoginPage Class or Activate
LoginPage loginPage = PageFactory.initElements(driver, LoginPage.class);
// Validate page show up using the title
String expectedTitle = "Login - TechFios Test Application - Billing"; // To store the actual title
String actualTitle = loginPage.getPageTitle(); // To get and store the title
System.out.println(actualTitle); // To print
Assert.assertEquals(actualTitle, expectedTitle, "Wrong page!");
// Call the login method from the LoginPage Class
loginPage.login("[email protected]", "abc123");
// Validate page show up using the Explicit Wait
DashboardPage dashboardPage = PageFactory.initElements(driver, DashboardPage.class); // Object Reference
dashboardPage.waitForPage();
}
@Test(priority = 2)
public void invalidUserShouldBeAbleToLogin() {
// Take you to the site
driver.get("http://techfios.com/test/billing/?ng=admin/");
// Calling LoginPage Class or Activate
LoginPage loginPage = PageFactory.initElements(driver, LoginPage.class);
// Validate page show up using the title
String expectedTitle = "Login - TechFios Test Application - Billing"; // To store the actual title
String actualTitle = loginPage.getPageTitle(); // To get and store the title
System.out.println(actualTitle); // To print
Assert.assertEquals(actualTitle, expectedTitle, "Wrong page!");
// Call the login method from the LoginPage Class
loginPage.login("[email protected]", "abc123");
// Validate Dashboard Page did not show up using Expilicit Wait try/catch
DashboardPage dashboardPage = PageFactory.initElements(driver, DashboardPage.class); // Object Reference
Assert.assertFalse(dashboardPage.isDashboardDisplayed(), "Invalid User was able to login!!");
}
@AfterMethod
public void close() {
// close and quit
driver.close();
driver.quit();
}
LoginPage:
WebDriver driver;
// Every Page must have a constructor to invite the driver
public LoginPage(WebDriver driver) {
this.driver = driver;
}
// Element Library
@FindBy(how = How.ID, using = "username")
WebElement UserName;
@FindBy(how = How.ID, using = "password")
WebElement Password;
@FindBy(how = How.NAME, using = "login")
WebElement SignInButton;
// Methods to interact with the elements
public void login(String userName, String password) {
UserName.sendKeys(userName);
Password.sendKeys(password);
SignInButton.click();
}
public String getPageTitle() {
return driver.getTitle();
}
DashboardPage:
WebDriver driver; // Global
// Every Page must have a constructor to invite the driver
public DashboardPage(WebDriver driver) {
this.driver = driver;
}
// Element Library
@FindBy(how = How.XPATH, using = "//h2[contains(text(),'Dashboard')]")
WebElement PageTitle;
@FindBy(how = How.LINK_TEXT, using = "Add Deposit")
WebElement AddDepositButton;
// Methods to interact with the elements
public void waitForPage() {
waitForElement(PageTitle, driver);
}
public void clickOnAddDepositButton() {
AddDepositButton.click();
}
public boolean isDashboardDisplayed() {
try {
waitForPage();
return true;
} catch (Exception e) {
}
return false;
}
BasePage:
public static void waitForElement(WebElement element, WebDriver driver) {
WebDriverWait wait = new WebDriverWait(driver, 10);
wait.until(ExpectedConditions.visibilityOf(element));
}
Notes
What is an automation Framework?
> A set of guidelines, not rules
> A platform for automation
> Designed in way to eliminate redundancy of code
> Increases efficiency
> Uniformity
> Set a standard
> Great for ever increasing test automation
> Organization of code
> It is the project, but organized and built with some
design in mind
> Has several components (Maven, Junit/TestNG, JSON/Excel)
GIT
1. Create a local repository and upload project (FIRST TIME ONLY):
1. Open GitBash in the folder where the project is located,
2. Type> git init - This will create a repository in your computer,
3. Type> git status - This will show which branch you are on and file status
4. Type> git add . - This will include all files in the staging area to be committed,
5. Type> git commit -m "Message goes here" - This will commit all changes and include a message
6. Type> git remote add origin [project url] - This will link remote to your local repository
7. Type> git push -u origin master - This will push your code to the remote master branch
2. Clone the project (FIRST TIME):
1. Open GitBash in a folder of your choice,
2. Type> git init
3. Type> git clone [project url] - This will clone the project into your local
4. Close GitBash and reopen GitBash in the new cloned folder
5. Type> mvn clean
6. Type> mvn install
7. Open Eclipse, go to new, click Open Project From File System,
8. Browse to the project folder and click finish.
3. Update code and create a pull request (FOR EVERY TEST CASE):
1. Open GitBash in the folder where the project is located,
2. Type> git branch - This will show you which branch you are on
3. Type> git pull - If you are on master, this will pull the latest code
4. Type> git checkout -b [new branch name] - This will copy the master into your new branch
5. Go back to your project and write your code, then open GitBash again,
6. Type> git add .
7. Type> git commit -m "Message goes here"
8. Type> git checkout master - This will move you to master branch
9. Type> git pull - This will pull the latest master
10. Type> git checkout [your branch name] - This will move you back to your branch
11. Type> git merge master - This will bring new master code to yours
12. Type> git push -u origin [your branch name] - This will create new branch in remote and with your code,
13. Login to remote repository (GitHub or BitBucket) to manually create a pull request.
1. Open GitBash in the folder where the project is located,
2. Type> git init - This will create a repository in your computer,
3. Type> git status - This will show which branch you are on and file status
4. Type> git add . - This will include all files in the staging area to be committed,
5. Type> git commit -m "Message goes here" - This will commit all changes and include a message
6. Type> git remote add origin [project url] - This will link remote to your local repository
7. Type> git push -u origin master - This will push your code to the remote master branch
2. Clone the project (FIRST TIME):
1. Open GitBash in a folder of your choice,
2. Type> git init
3. Type> git clone [project url] - This will clone the project into your local
4. Close GitBash and reopen GitBash in the new cloned folder
5. Type> mvn clean
6. Type> mvn install
7. Open Eclipse, go to new, click Open Project From File System,
8. Browse to the project folder and click finish.
3. Update code and create a pull request (FOR EVERY TEST CASE):
1. Open GitBash in the folder where the project is located,
2. Type> git branch - This will show you which branch you are on
3. Type> git pull - If you are on master, this will pull the latest code
4. Type> git checkout -b [new branch name] - This will copy the master into your new branch
5. Go back to your project and write your code, then open GitBash again,
6. Type> git add .
7. Type> git commit -m "Message goes here"
8. Type> git checkout master - This will move you to master branch
9. Type> git pull - This will pull the latest master
10. Type> git checkout [your branch name] - This will move you back to your branch
11. Type> git merge master - This will bring new master code to yours
12. Type> git push -u origin [your branch name] - This will create new branch in remote and with your code,
13. Login to remote repository (GitHub or BitBucket) to manually create a pull request.
